How do I set up the Advally XenForo 2 Advertising Plugin?
The Advally XenForo 2 Plugin is easy to use, and designed to allow a forum’s Admin configure it.
Last Updated September 11th, 2025
Advally’s XenForo 2 Plugin serves programmatic advertising and gives you control via a centralized configuration, right in your XenForo Admin panel. This article gives instructions on installation and initial setup.
Installation & Setup Overview
- Please Enroll for Advally’s programmatic advertising services. Enrollment is quick and allows us to begin setting up your programmatic demand:
- Enroll Here: https://advally.com/enroll
- Download and install the plugin. The download and install instructions are outlined below.
- Allow the Advally XenForo Plugin to manage your site’s /ads.txt. This industry initiative will authorize Advally to represent your advertising inventory on the digital markets.
- Configure Ad Experiences for your users through the Advally XenForo plugin.
- Enable Advally Ads in the plugin.
Plugin Installation or Upgrade
The process for installing or upgrading the XenForo plugin is the same:
- Download the latest version of the plugin here:
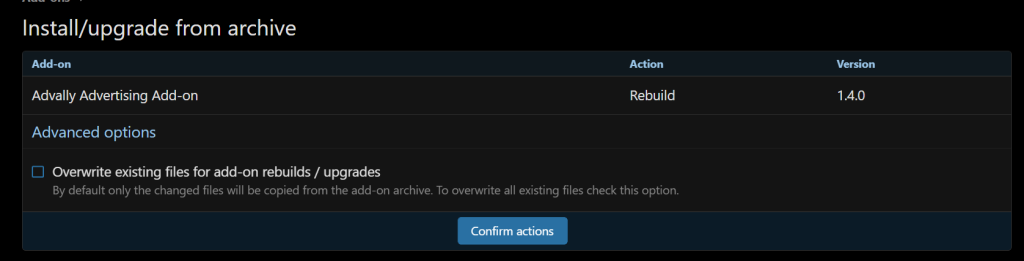
- Login to your XenForo Admin, under Add-ons > Add-ons
- Click Install/Upgrade from archive
- Select the downloaded ZIP archive, click Upload
- Click “Confirm Action” to continue

Installing the plugin won’t affect any of your current advertising. All features of Advally’s XenForo plugin are disabled by default and will have to be enabled through the Plugin’s Admin settings to serve Advally’s programmatic ads. The plugin requires some configuration settings from Advally to function, which Advally will provide once your property is enrolled and approved for our advertising services.
Initial Setup
Advally must approve and align demand for your site before you can begin to earn money. You should enroll for Advally’s services if you haven’t already, and submit your website’s domain name for review.
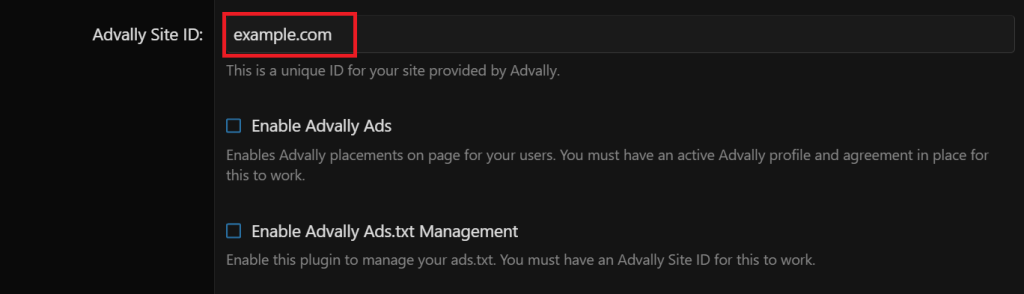
Once approved, Advally will provide a Site ID for you to enter in the plugin’s XenForo configuration. The Site ID is an identifier that’s unique for your website.
- Visit your website’s XenForo Admin panel
- Browse to Setup > Options
- Click “Advally Advertising Settings”
- Enter the Site ID
- Click Save
Ads.txt Management
Advally, like all programmatic ad partners, require that your site has a valid ads.txt, and must contain the lines Advally provides so we can manage your programmatic demand. Advally cannot get approval from our network partners without this!
Advally recommends using a redirect to manage ads.txt whenever possible, this provides the easiest and safest method of ads.txt management for publishers. Advally will notify you when your ads.txt redirect endpoint is ready, and will provide instructions and guidance to help you get setup!
If not using a redirect, our XenForo Plugin can also manage /ads.txt on your site. The plugin’s settings in the XenForo Admin will display if /ads.txt can be managed automatically, and the plugin contains a feature to manage its contents. Enabling this feature requires a Site ID which Advally will provide you.
.png?width=688&height=113&name=image-from-clipboard%20(1).png)
Verify Your Ads.txt
Receiving a Site ID from Advally means that your site is ready for onboarding and Advally has begun to prepare advertising partners for your inventory. You can also see your site in our system if you login to Advally’s Dashboard.
Here is how you can verify that Advally sees the ads.txt we require to continue:
- Open the Advally’s Dashboard
- Expand the left navigation and select Ads.txt for the site you wish to check
- Click “Verify Ads.txt”
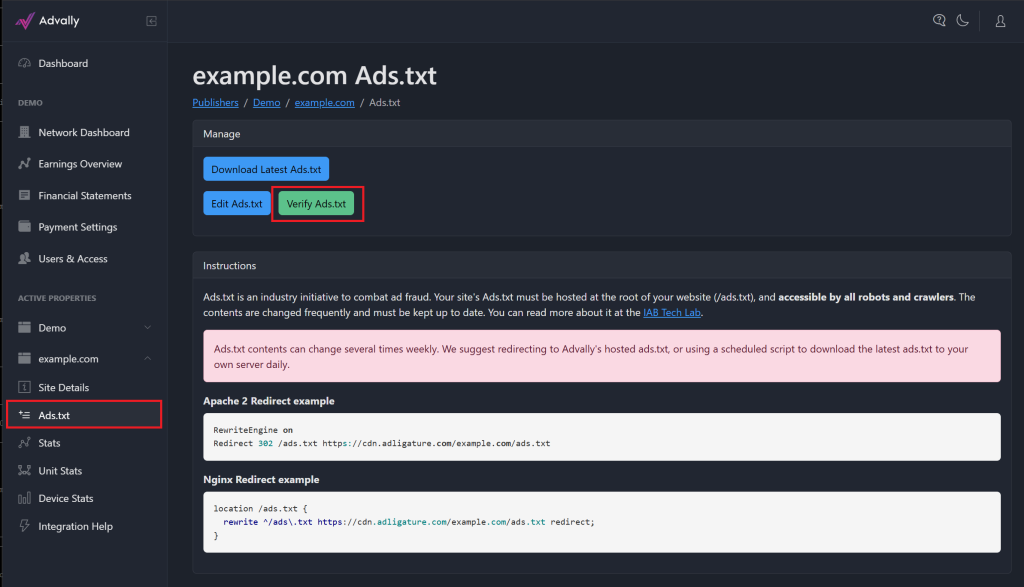
You will receive a status page that indicates if ads.txt was found and whether it contains all the correct lines.
If you are missing any lines or your site currently redirects “/ads.txt” to a 3rd party, you will want to change this to redirect to Advally’s hosted ads.txt instead. If you have an existing ad partner when you signed up for Advally, our ads.txt will authorize the existing partner alongside Advally so your existing ads will work while we prepare ours!
Launching Your Ads!
Advally will notify you once your ads are ready to deploy! You will receive an e-mail when Advally has aligned your website’s demand with the help of your verified ads.txt. Here is how to deploy your new ads:
- Visit your website’s XenForo Admin panel
- Disable any existing Ad Placements:
- Check for any other active Advertising plugins and disable them
- Disable any active slots under Setup > Advertising
- Browse to Setup > Options
- Click “Advally Advertising Settings”
- Click “Enable Advally Ads”
- Click Save
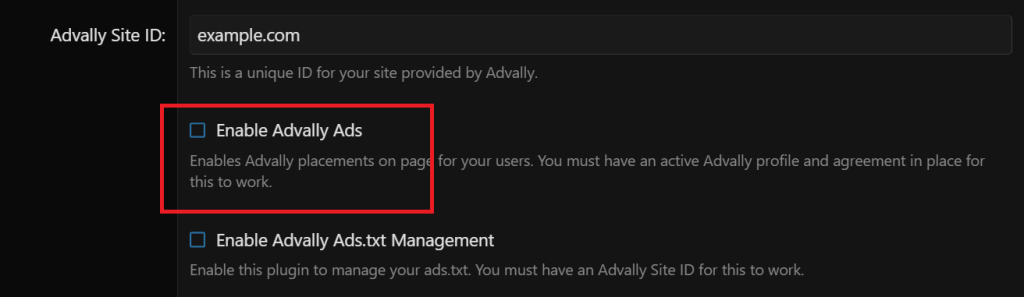
Enable Ads will automatically turn back off if your site isn’t ready in Advally’s system.
Once live your users will begin seeing the new ad units. Continue reading to learn more about the possible settings for the plugin.
Advally Ad Plugin Settings
The Advally XenFor Advertising plugin contains several settings to allow ad placements to better embed in your site. These can be accessed here:
- Visit your website’s XenForo Admin panel
- Browse to Setup > Options
- Click “Advally Advertising Settings”
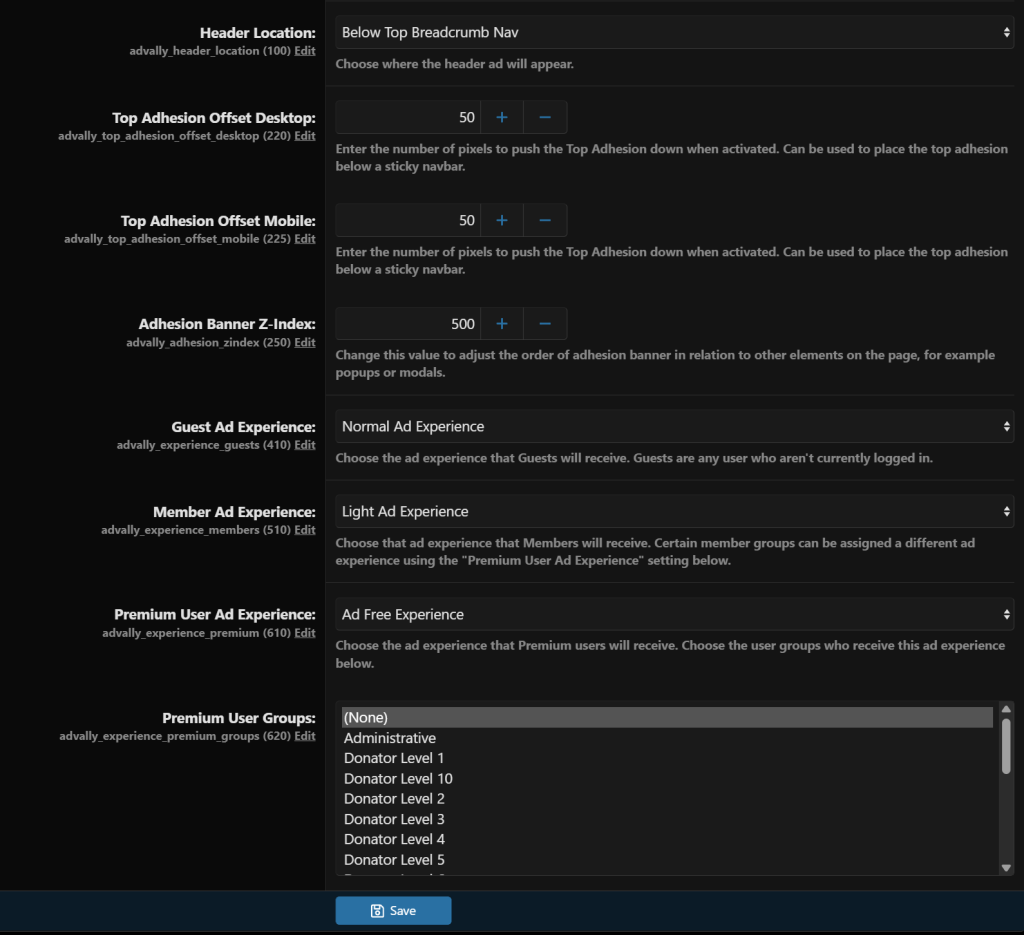
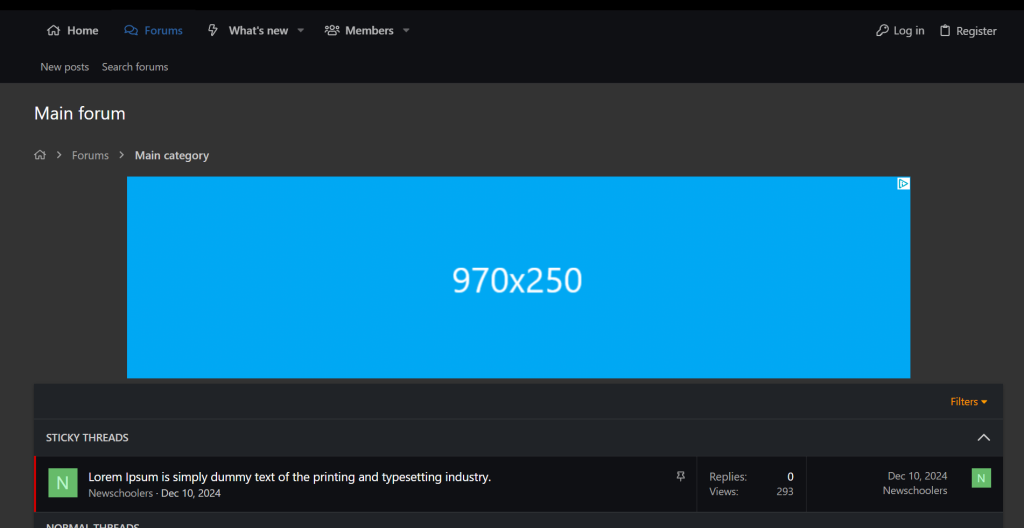
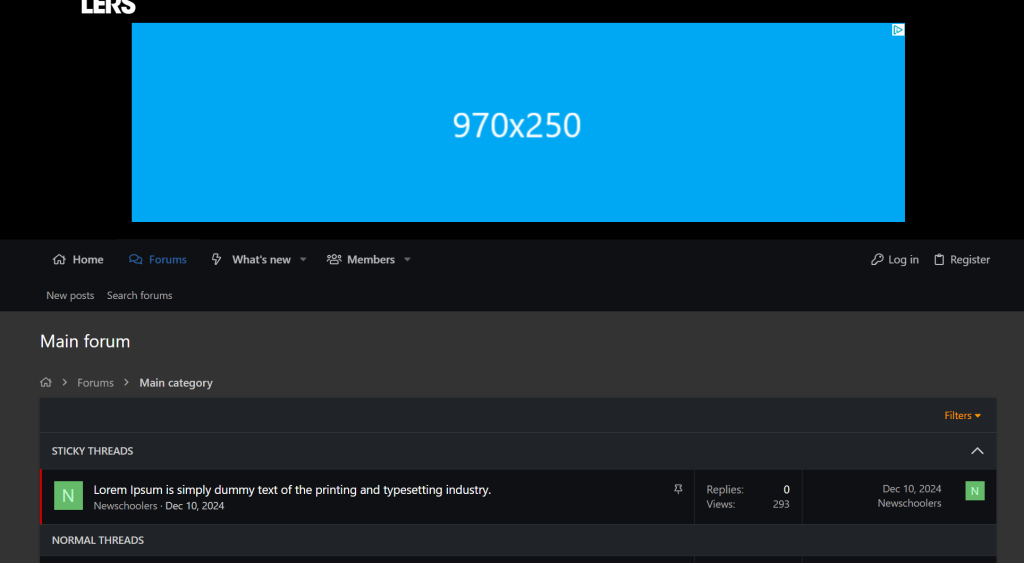
Header Location
Chooses the location of the Header unit which appears at the top of the page. For example, you could choose to place the header above or below the Breadcrumb Navigation:
Or in the Header Container at the top of the site:
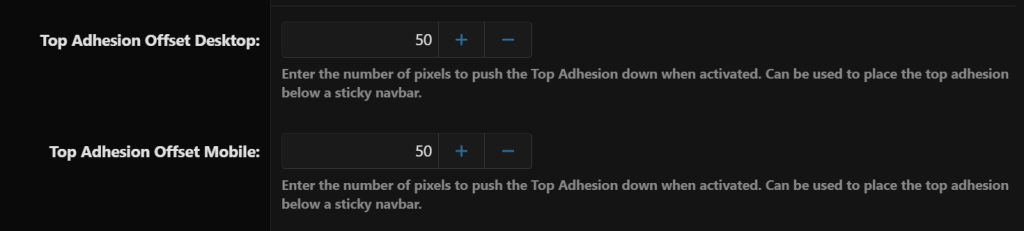
Top Adhesion Offset
An “Adhesion” unit is a unit that sticks to the edge of the browser window and scrolls with the user. Adhesion units stick right to the edge of the window by default, however some themes have menu bars that stick on scroll that you don’t want to cover.
.png?width=611&height=246&name=image-from-clipboard%20(3).png)
These two settings move the Top Adhesion away from the edge so it doesn’t interfere with your floating menu:
Adhesion Banner Z-Index
Similarly, the Z-Index controls how the adhesion unit is layered in relation to other elements on page. The default should allow the Adhesion unit to float above your content, however you can adjust the z-index value if you find it interferes with elements on page.
Put a higher number if it is rendering below elements when it shouldn’t.
Put a smaller number if it’s covering elements it shouldn’t.
Member Experience
Advally’s XenForo Ad Plugin provides the option to present a different ad layout based on the user type. The plugin comes preconfigured with several “Ad Experiences” which are customizable, and by default members are given a lighter ad experience than guests.
The plugin has support for 3 types of users:
- Guests – Any user who is not yet logged in
- Members – Any logged in Member
- Premium Users – A logged in member who belongs to a specific User Group
Each user is assigned one of the 4 Ad Experiences. These are configurable, but by default they are:
- Light Ad Experience – Only banner ads in fixed locations such as the header, sidebar, and in forums & threads
- Normal Ad Experience – All the same ads as Light, but includes sticky banners, interstitials, and inline video on threads
- Nascar Ad Experience – All the same ads as Normal but with higher frequency
- Ad-Free – No Ads of any kind
By default guests receive the Normal Ad Experience, and members will receive the Light Ad Experience.
You can select XenForo User Groups to be part of the plugin’s “Premium Users”, which by default would add them to the Ad Free Experience. It’s common for forum administrators to assign User Groups such as Moderators, Subscribers, or VIP Members to this group to disable advertising.
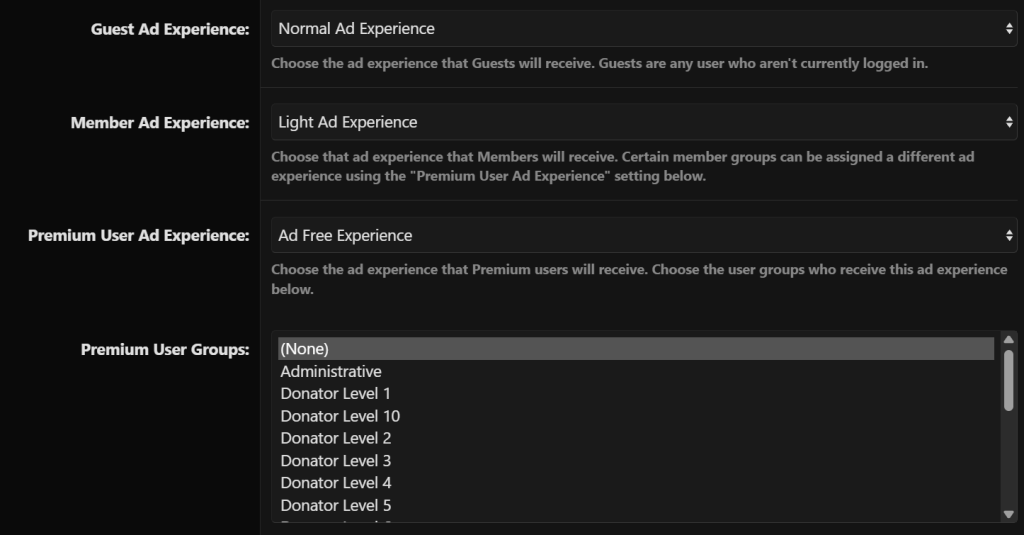
Premium Users are any users belonging to Groups selected under “Premium User Groups”. If a user belongs to one of these selected groups, they will receive the Premium User Ad Experience.
Troubleshooting Common Issues
While the plugin is designed to be user-friendly, issues can arise. Common problems include difficulties with the Ads.txt file or issues with ad visibility. In such cases, consulting the Advally support documentation can provide quick solutions. Furthermore, engaging with the community forums can offer insights from fellow users who may have faced similar challenges.
Once your site is approved for Advally’s programmatic services, you’ll receive a dedicated support team to assist you through the process. This guidance is invaluable, especially for newcomers to ad management. They will walk you through each step, from integrating the Advally XenForo 2 Advertising Plugin to optimizing your ad settings for maximum revenue.
For optimal results, it’s vital to follow best practices in ad placement. A/B testing various ad placements can reveal what works best for your forum’s layout. Generally, ads placed above the fold tend to garner higher visibility and engagement. Additionally, ensuring that ads do not interfere with the user experience, such as by obstructing content or navigation, is crucial for maintaining user satisfaction.
Future of Advertising on XenForo
As the digital landscape evolves, so does the advertising ecosystem. Staying updated on trends and technologies is essential for forum administrators. Innovations such as AI-driven ad placements and enhanced targeting capabilities can provide new opportunities for revenue generation. Embracing these advancements not only keeps your forum competitive but also enriches the user experience by offering more relevant content.
User Engagement and Ad Impact
Understanding the relationship between user engagement and advertising is crucial. Engaged users are more likely to interact with ads, leading to higher click-through rates and conversions. Implementing strategies to foster community interaction, such as polls or discussion threads, can enhance user engagement, subsequently benefiting your advertising efforts.
Additionally, consider the type of ads displayed on your forum. Sponsored content or native ads can be less intrusive and may even enhance the user experience by providing valuable information relevant to the forum’s topics. Balancing ad placements with user experience is key to successful monetization.
Related Articles
XenForo 2 Plugin Ad Experiences
With our Plugin, you can customize your Ad Layout for different User Groups.
Read More